Wednesday, 18 July 2012

"Lily-Palooza"- Bloomers Revisited

     
      What glorious days I'm living in,..you should see my yard! Half of our nearly ninety varieties are in full fantastic bloom! It's an adventure every day. Watching as the colors paint themselves across our acre and a half of east coast heaven is a gift with every new dawning day. 


      Early in the day I am photographing who's new for use in a catalog for next years market. In the evenings, I "deadhead" the plants and given that they're daylilies there are a bunch of them every night.  Prior to this busy week I would put the spent blooms in the compost pile. Well, not any more! Turns our daylilies make a great renewable resource for handmade paper. We're growing absolute bucketfuls out there here's to a new way to reap the benefits, A new day has come!  
      In my last post I mentioned that I would try to make handmade paper from the spent blooms. It's been an interesting week as it turns out. The lilies have a viscous sturdy make up, so the resulting paper is durable and could be made with 100% lily pulp. The drawback was that with out paper content there is a degree of shrinkage as it dries, so a minimum of recycled paper seems necessary to ensure it keeps a predictable size and shape. Check out the samples below. They were all made with the same deckle and mould but larger paper/lily sheets have maintained their 5"x7"  size while the others with more pure lily pulp decreased in size by a full 3/4 of an inch.


Daylight was fading when I took this photo,
colors are truer in the photo below
     
                 Predicting color has its many considerations as well. To some degree, the lilies color the paper, but it must be said that the freshness of the flowers is proportionate to the strength of color. When they start to wilt the color isn't as rich, and since the pulp is perishable vegetable matter,  if they sit to long after you pick them the flesh goes brown like a bitten apple. The richest reds however have really potent dye and some of the richer yellows hold up well. The more pastel lilies loose their color almost completely. However. you can supplement color with the paper you add.
Lilies and their corresponding papers.
     Their versatility knows no bounds because on top of everything else they are edible. In a salad they are beyond gorgeous. Of course by supper time they look like last weeks produce so best for lunch. They can be used to make jelly. flavor herbal vinegars, and there's a heritage recipe for daylily fritters on line.  Check out "The Delightful Delicious Daylily: Recipes and More"  by Peter Gail. Seriously,who'd have thunk it?


Tuesday, 17 July 2012

Art, in the Name of Love.


Saul the Seagull, created for the National Anglican Synod,
held in Halifax in 2010.

      Through the 40 years we've been together, my husband has been a teacher, a principal, an educational administrator, is yet a professor and now as well, an Anglican priest. Between of all of these professions he has often been a student as well. With two Bachelor degrees, three Masters degrees, an Educational Doctorate and the better part of his current Masters in Divinity he's the most "certified" soul on the planet.
     
     In his many roles, my husband has always prepared a wicked lesson plan, presentation, speech or sermon. He is an amazing speaker and amongst his students, co-workers, fellow students and parishioners he has actual fans. They all love him.

Handmade paper collage to illustrate
Psalm 137- "..by the rivers of Babylon"


      From time to time and usually at the last gosh darn minute, he asks for " just a little sketch" to better illustrate his topic of the moment. Poor fella can't draw a stick man without guidance  ( I guess he's been to darn busy to fit drawing lessons into his portfolio. Lol..) but he believes that I can perform miracles. I'm always stunned when he and others comment on my work with this awe and appreciation. I forget that this ability, that is innate and "usual" to me and many others, isn't always so in everyone. Then, I count my blessings and tackle the next project.


My very old Sunday school sheep-
Papier mache using egg cartons.
      Needless to say, there have been some varied requests. I've made visual aids for presentations, illustrations  and "Show-and-Tell" pieces for sermons, designs for the covers of church bulletins, murals in churches and schools, props and sets for plays, window paintings. Once I did portraits in pencil for a whole grade five class and the students had a bake sale to pay my "commission".


Palm Sunday donkey using strip paper mache.      
     
      On another occasion, he invited me to be a hands-on assistant to Renee Forestall, an artist and educator who is also the daughter of acclaimed east coast Canadian painter, Tom Forrestall, whose art has been classified as Magic Realism. Renee was educating classroom teachers who suddenly found themselves having to provide art instruction when art programs and their teachers were slashed out of existence due to cutbacks. She is the inspiration of  all of my paper and paper mache passion, adding leaps and bounds to my repertoire of media and creative play.


Collage of odd bits to represent
"Communion with Mankind"
      Over the years, it feels like I've must've made a thousand odd things. Now, hindsight is bittersweet and 20/20 let me tell you. I should've taken time to photograph every one of those myriad "masterpieces. What fun we could've had! I'd have had fodder for blogs for the next five decades. Luckily, there are still a few pieces kicking around for me to share them in todays blog.

A dove in pen and ink for a church bulletin.
       
      Some of my favorite pieces were pen and ink sketches created for church bulletins. With so many techniques to tempt me, I rarely just enjoy the simplicity of drawing. Every now and then when I do pick up a pencil or pen and ink, what a pleasure it is.
      
Another sunday bulletin cover
        Now that I'm fully equipped and trying something new everyday, It will be a privilege to record every future. project and share them here as well. It's been exciting to refresh my memory and have a venue to share. Happy days everyone!!

Thursday, 12 July 2012

"Isaac's Bloomers."

      Our Number Three Son has left me holding a bunch of wild bloomers. Bloomers of all shapes and sizes, bloomers that for the next month or so will delight and thrill and tickle my fancy, bloomers full of slugs to squish?.. and weeds to wrench by their wretched, evil, conniving roots?
     
       No, we're not talking boxer-cut Hanes or bedeviling banana hammocks by Calvin Klein. We're talking daylilies. Eighty-four different registered cultivars. The beginning of the bloom season is already tempting me out the door at 6 am, coffee in hand and jammies on half sideways. I can't wait to roam amongst the dewy green foliage to search the beds and see who is blooming each day.


"Kwanso"


      Isaac worked as a gardener for three summers, trying to pocket a different "green" to help with tuition costs. He fell in love with these beauties and every couple of days he'd bring a few more home. Soon he had commandeered every ounce of arable garden space.


     My vegetable garden  all but disappeared at the end of that summer. A grower that he'd become acquainted with was downsizing his garden and whole clumps arrived by the truck full. I have to admit it was fun, learning something new from one of the  "youngsters". The process of dividing the clumps and "lining them out" for sale the following season was something I'd never done.


"Lavender Stardust"
     
With their arrival began lots of reading. Discovering that these daylilies weren't just the orange ones in every grandma's garden but over 60,000 varieties in shades and shapes and sizes I'd never imagined. Even greater was the knowledge that they are tough, impossible to kill and that they multiply like bunnies and bring your yard alive with such showy dazzling color. Bonus,..Bonus, bonus bonus!
"Scatterbrain"
      They come with some off-the-wall monikers too! Imagine if you will, Scatterbrain, Lies and Lipstick, Body Rub, Big Kiss, Druids Chant and Zola's Pink Nightgown!

"Lies and Lipstick"
      Isaac and I have even hybridized a few of our own as well. A refresher course for me in simple genetics ( AND honing my communication skills when the neighbours wonder why I'm flitting  from lily to lily with a pollen laden stamen from one flower in my two fingers to gently dab the pistil of another.)
      
      What an awesome way to get those old synapses firing.  We have three different crosses bearing at least 30 new variations are already blooming for the second time. Those babies will need crazy names of their own. I have 15 plants from another cross that may bloom this year AND a whack of new seedlings from last summer in a shady corner by the woodshed. It's like Christmas when they finally bloom for the first time. 
      As a new and exciting note, I thought I'd experiment with lily "pulp" as a resource for handmade paper. I went out with my coffee and gathered 6-8 spent blooms and twenty minutes later there are two sheets of lily paper drying on the window sill!  More about that in a later post.

"Baby Betsy"
      
      The boy is beyond busy now. Life has "happened" as it invariably does. I am weeding and coddling his babies for him at the moment.  As he grows into the hustle and bustle of his new life one thing is for certain, with all those fresh new faces greeting me each morning, my nest won't ever be empty. 
       

Thursday, 28 June 2012

Two Outta Three Ain't Bad

       As you know from past posts, I am a procrastinator with a penchant for papier mache. I love it because paper is a practical and plentiful resource. I've lost track of the multitude of projects over the years. These handsome fellows are 18 years old. Two out of three "wise men", which I created  for Christmas for my Mom-in-law.
      My old encyclopedias state that "according to Western church tradition, Balthazar is often represented as a king of Arabia, Melchior as a king of Persia, and Gaspar as a king of India." These names apparently derive from a Greek manuscript probably composed in Alexandria around 500 A.D., and which has been translated into Latin."
      At that time. I had created two or three sets of these fellows and other pieces featuring the characters of the nativity. As well, I crafted pieces for a sister-in-law who collected snow men and another who collected "Father Christmases". When you're artistic, it's a safe bet that everyone will want a masterpiece for Christmas.
      These two were the last of the bunch that year but my two littlest men were a two year old and a newborn. Time was at a premium and Pampers and pablum won the fight.
      As I begin, two decades later, to formulate a plan to present papier mache sculpture as a workshop, it's in the works to finally create that last fellow. Gaspar needs to catch up with his buddies and their reunion is long overdue.
      I promise a "step by step" blog when he finally comes into being and hopefully some other pieces as well. I'm still getting my head around how to present the sculpture as a workshop as many pieces build and dry in stages. Other pieces slap together in one session like the sun shown below.                            


       Some simpler pieces, like the sheep below, were just a few steps. Though it was some time ago, I remember schmucking a layer of mash on two upside down bread pans, adding legs in the first step to one of them and leaving a neck hole in the other. Slow drying both in a low oven. Sticking the two together and drying it again. The head was originally made to come off because he was a Sunday school collection jar. Adults thought it was morose but the kids thought it was hilarious. He's as old as the hills but i couldn't resist including him.
        Lots of years and lots of fun later, I can't wait to share more projects with you. I'm still waging a battle to equip myself.  I have prepared  a nice long blog with the "How-tos" of handmade paper. My son returned my camera and charger, which spent six months on an Australian adventure with he and his best girl. So, last week I took oodles of "how-to" pictures. However, I think my USB cable stayed in Wollongong or Yamba or Tazmania because it didn't make it back to me!!
      My next blog needs its pictures pronto! A trip to the Sony store is in order. Please stay tuned!!

Thursday, 21 June 2012

The Fly-by-the-Seat-of-Your-Pants "How-To" Tutorial of Eco-Awesome Handmade Paper.


      As a teacher, I would most decidedly have been the nutty professor type. The students would've loved me and the parents would've wanted me relocated. Innate disorganization would be characteristic "A"  because with head full of ideas and bubbling over with enthusiasm for things tactile and experimental, there is little room for sensibility. It's all about the "sense", the feeling your way through! Miss Frizzle would say; "Take chances, make mistakes, get messy!   Such was the case at my first work shop and now I'm bounding obliviously and ingenuously onward from there. 
       Last Friday, on a whim, I strode into our regional parks recreation office to inquire about the deadline for the publication of their fall schedule. The tireless fellow in charge said: "The first draft is on my desk and I'm finalizing for the printers on Monday." Wow, was that great timing,  pretty sure it was destiny. 
      I walked out with a commitment for a one day workshop in October. The facility is amazing with great light a sink and tons of workspace.
       Right now, I thought I'd try my shtick out on all of you.  Eco-Awesome Handmade Paper is a true success story of today's need to "Reduce, Reuse and Recycle".  Inasmuch as we have been begged to try to live paperless, we are still monsoooned with mountains of it on a daily basis. Here is an option to turn swords into plowshares, trash into treasure!
      The raw materials are water and a supply of ANY scrap and used paper and other natural or plant based fibers to be shredded or soaked and broken down.
      The Eco-purists list of tools needed would be some screen or mesh, a rolling pin or an empty wine bottle. ( or even better, a full one, then you can celebrate when the spirit moves you. ). To save time and labor I did use a paper shredder and a blender proves most useful.  Also needed, lots of containers, tubs, basins or sinks. 
      As the instructor, I provided materials for the participants. Oodles of types and colors of used paper were pre-shredded and bagged up for use. I had handmade the screens or deckle and mould sets and brought fabric to blot our new  handmade papers. I'm getting ahead of myself though, let's start at the beginning.


STEP 1 - Ready your space. Have on hand some shredded paper, several pitchers of water, an assembled blender,  a basin or sink ready to receive quantities of blended paper pulp or slurry,  deckle and moulds ready nearby a supply of old towels or other absorbent fabric for "couching" or blotting excess water from your new paper and a rolling pin or wine bottle to press out excess water.


STEP 2 - Pour enough water into a blender to fill it one third of the way. Add a handful of shredded paper and start the blender on low. Gradually increase speed and little additions of paper until you achieve a max speed and the blender running full and efficiently. You will need to feel your way through for the balance of paper, water and blender speed. ( If your paper is intend to be used for writing or painting, now is the time to add three or four  teaspoons of liquid starch. This prevents some of the bleeding of ink or paint into the paper fibers. )


STEP 3 - Fill the basin partway with water then depending on the size of the basin, add 2 or 3 blenders full of slurry. The volume of both combined should be well enough to entirely submerge the deckle and mould. ( The mould or screen is to catch the pulp, the deckle is held on top of the mould to give the paper a nice even edge and keep the slurry from flowing over the side of the mould when you lift the set out of the basin. ) Wiggle it around a bit while submerged to obtain an even layer of pulp all over the screen. Holding the deckle and mould as level as possible, lift them slowly out the basin. tip the set a little, over the sink or basin and allow as much water to drain out as possible.


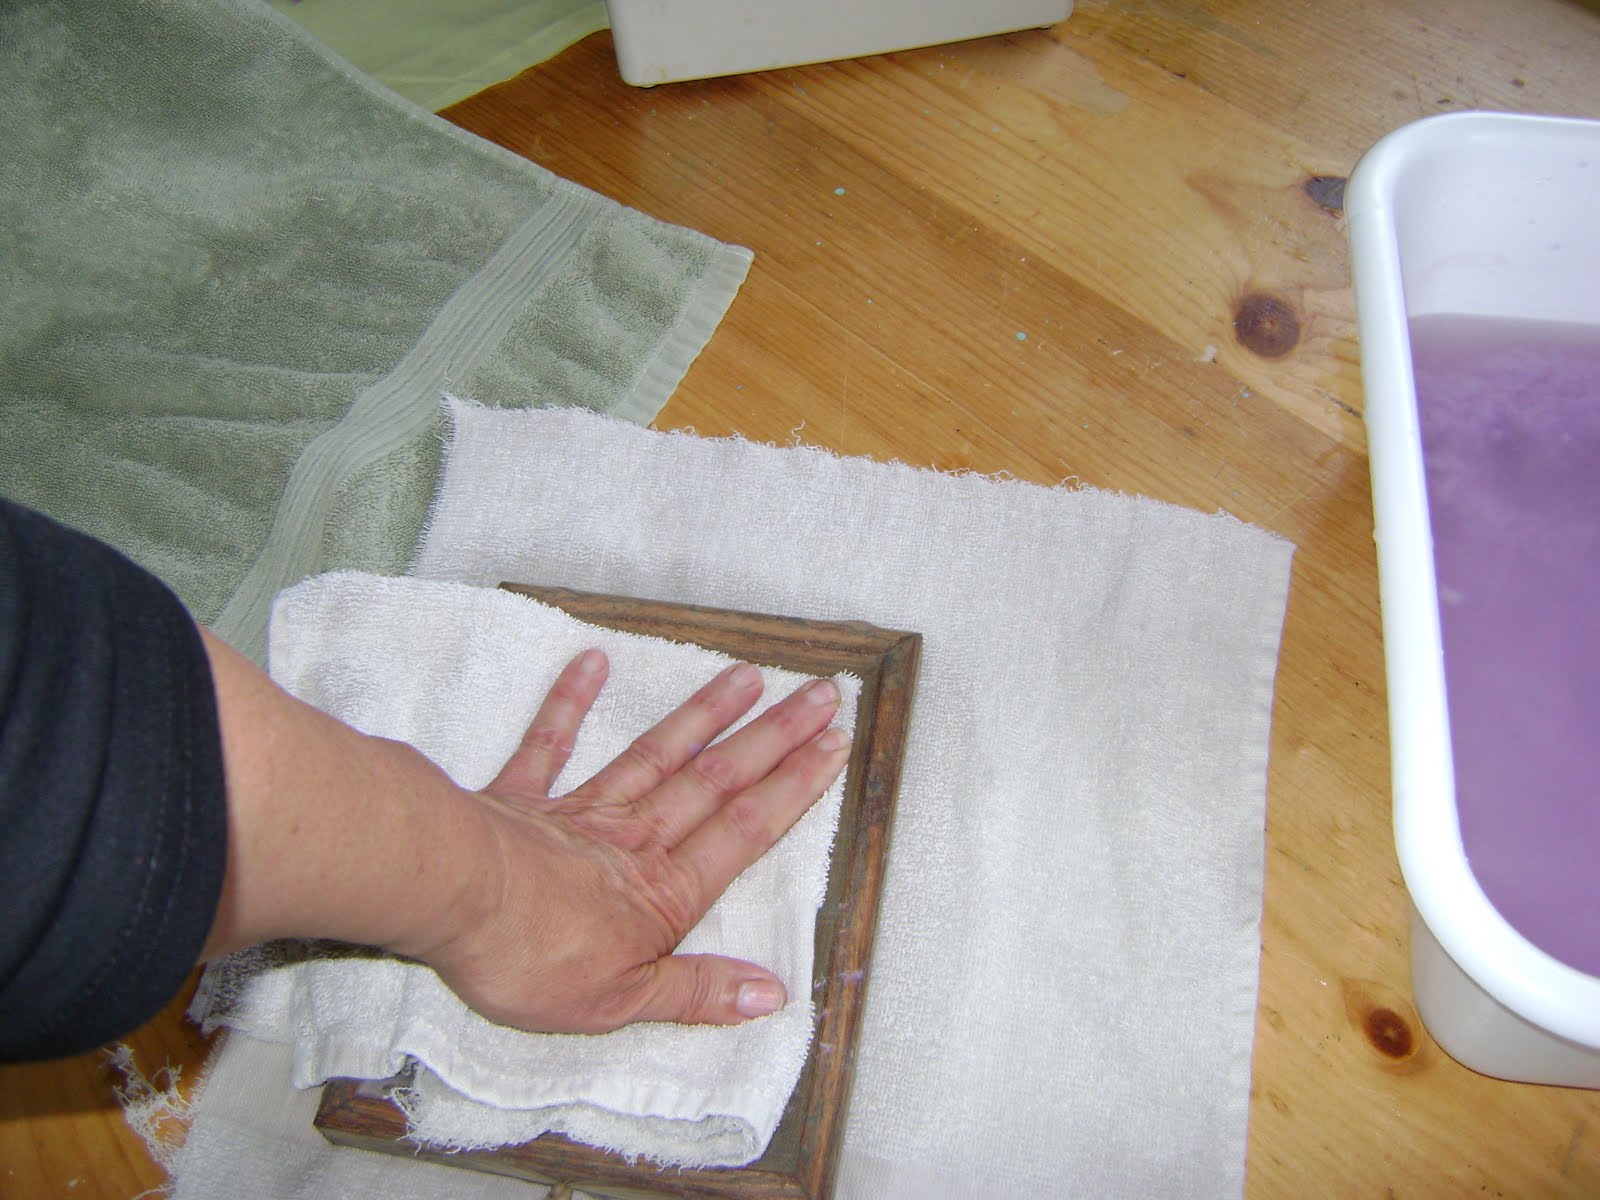
STEP 4 - When everything stops dripping carefully remove the deckle and flip the mould onto a layer of absorbent material. Blot out as much water as possible with more fabric or a sponge.
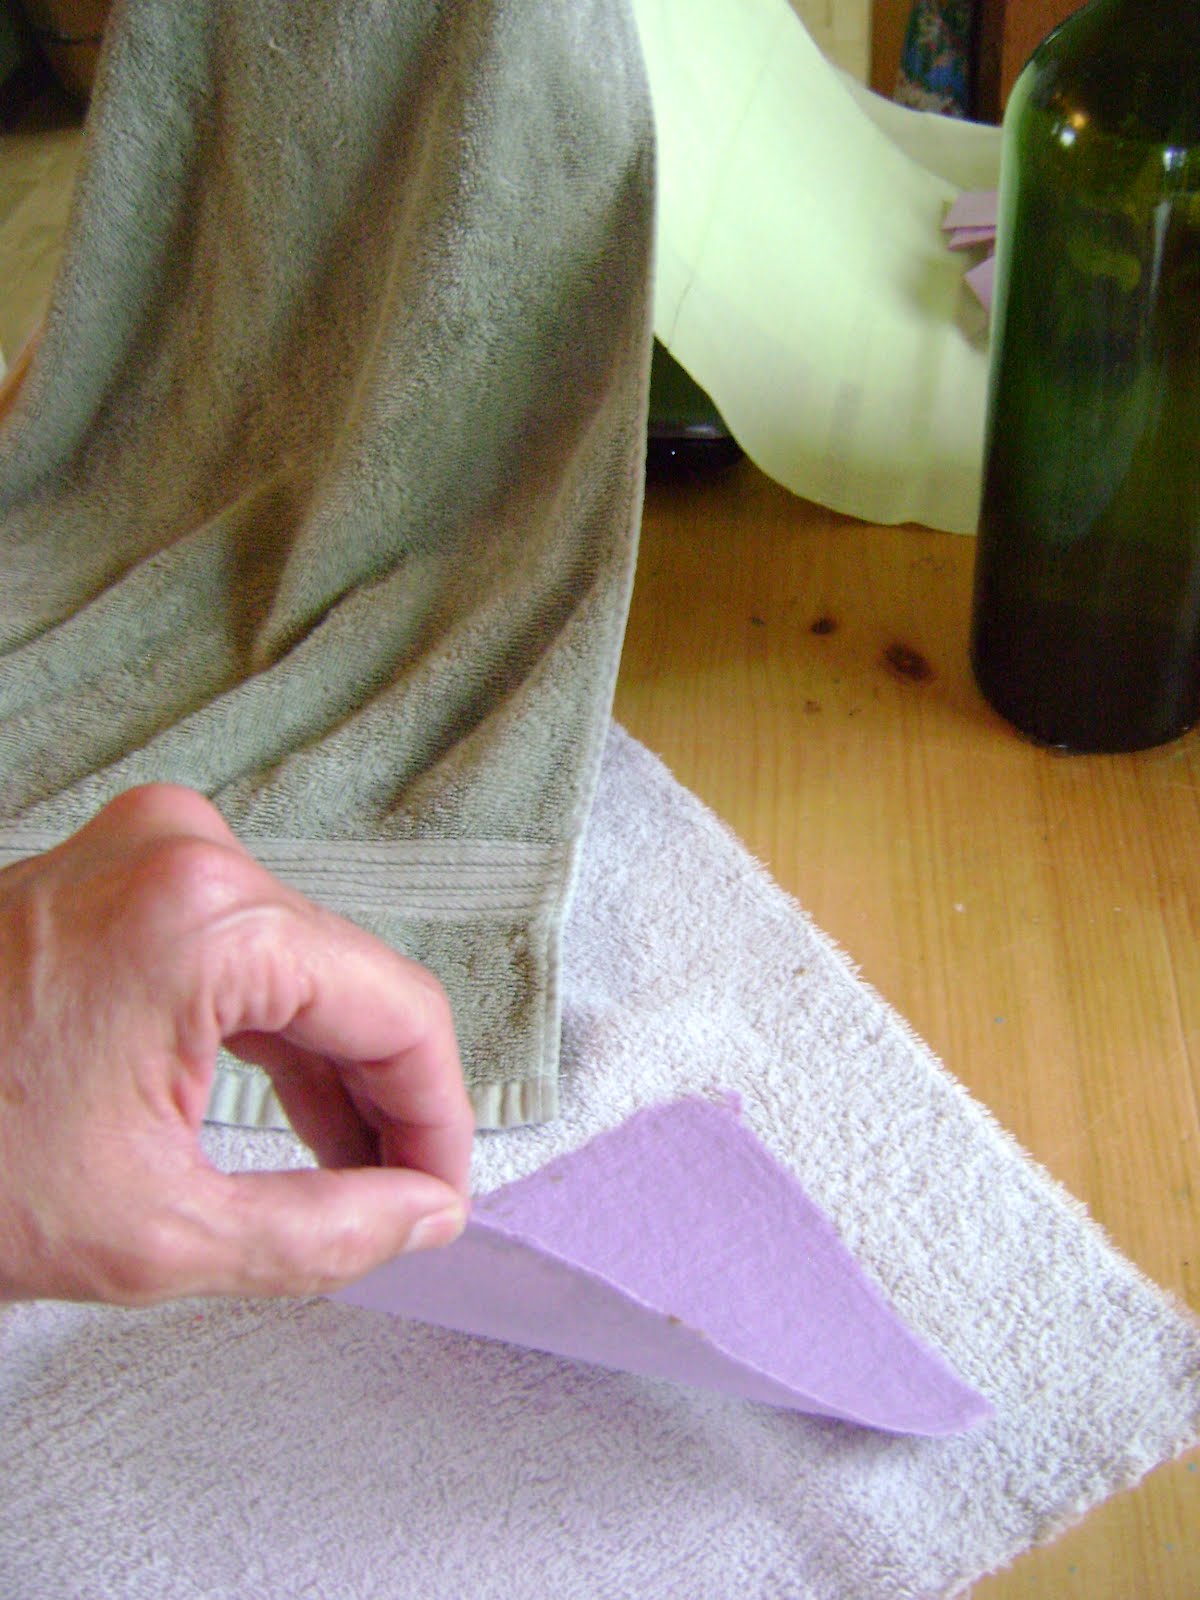
CAREFULLY hold the fabric square flat and pull up the mould.  The new paper should remain on the fabric square. If it sticks to the mould you may need to blot out more water and try again.


STEP 5 -  At this point most resources tell you to keep dipping more sheets of paper, adding more slurry as you need it. Then you are asked to stack the couching fabric/new paper layers on the backside of a cookie sheet or cutting board or something flat, then place another of the same on top of the stack.  Using sufficient body weight, you press out even more water.
       I just placed more dry absorbent fabric on top and used a rolling pin to really wring it out. 
      You can keep flipping it, peeling off the wet couching cloth and then rolling it out again between dry ones. When enough water has been removed  it will be easy to see that 
the sheet has  become sturdy enough to pick up and move to a flat place to dry.


        These instructions will help you create very basic papers. In my next few blogs I will explore variations on the basic plan. I hope those of you following my blog will give it a try and drop a line to share your experiences or ask questions. Happy recycling!!! 


Wednesday, 20 June 2012

The "Feel Good" Diversion.

        Some years ago, in mid-autumn, I found myself caring for my Mom-in-law throughout her battle with ovarian cancer. My husband and my eldest son were left to fill the gaps which I was leaving in our home life. The younger boys were 12 and 14. Bravely and diligently, they did so well during necessary time of independence but I was missed. As Christmas approached and we were made aware that their grandmother would lose her battle, Matthew and I put our heads together to find some way to give his younger siblings at least a glimmer of the brightness that the season was supposed to hold.
     All the boys, at that time, had bedrooms on the lower floor of our home and a common living area ..all to become be their new "bachelor pad". A place for the bros to hang out and be "men". A new TV, video player and game system came for Christmas. They had beforehand painted my whole bottom floor. Believe me,  "bright" does no justice to the intensity of their color choices.
      My part was to provide artwork befitting the common living area. This was a task I could carry out while their grandmother was resting and we shared more than a chuckle or two at the subject matter.


      As an art student you often learn by painting  "in the style of" other artists. I searched for examples in the genre of contemporary
 man cave cartoonish and found the lively and libidinous work of an Australian artist by the name of David Laity. His ladies, inspired by his wife Regina, are curvy and exaggerated in all the right places. Some of mine are my own compositions but emulate his style.
        My league of extraordinary gentlemen approved heartily. I completed seven little pieces on whatever "canvas" I could find using the wall colors from their living area as background.  Sentimentality and also because they're painted " in the style" of someone else dictates that  they will remain in the family. They've been quirky conversation pieces for over six years now. The odd raised eyebrow over the years might mean some would wonder at the appropriateness of my atypical approach to motherhood. But they sure lightened the mood through some gloomy days. I hope you enjoy them too!!

Tuesday, 12 June 2012

Gotta Feel Real Loose, Like a Long-Necked Goose!!

            This week has been all about letting it all hang.The flock made it back to the roost for a half dozen family celebrations that needed "toasting" to. A chance to connect and play and feast a little. I'm a walking contradiction as I learn to appreciate the peace of my emptying nest then find myself ecstatic with glee when they all come back.
      
       At the first of the year, my one resolution was to learn to be selfish. Seems odd I know, but in my case this takes practice. I have to step out of the daily grind if I'm ever to generate "genius". With the full support of the whole clan, I'm getting out there and great things are happening. The inaugural art workshop was a springboard for continuous interest and suddenly opportunity knocks and I'm running for the door.

      The winds of change are whispering, I hear Monty Python's immortal segue taunting me."...And now for something completely different"

      With the limited time to paint and create over the years, most work was commissioned. The expectations of the customer being forefront, one tends to create for their satisfaction. Creating for me is now long overdue. This week, I finally found time to play!

        Last month's workshop yielded a dozen or so zipper-sealed bags of various blendered paper pulp. I've heard their muffled voices calling from my freezer til now. Getting loose was the order of the day when I had oodles of fun "painting" with spoonfuls of paper poured onto a deckle and mould, painting with sloshy pulp. At the end of the session there are lots of new pieces to adorn todays blog. Jerry Lee would say "Oh baby, thats a-what I like" and I really like todays crop!... I hope you do too!! 

     What a great exercise in coping with less control over a medium. It's trial and error, a wing and a prayer.
Then, how great is it when it turns out.?
      
      Later in the day I asked my fam to have a look and my little experiments were satisfyingly recognizable to each of them. I have a few others but I want to enhance them with some cut or torn paper additions. I'll slap them up in a blog in a few days. A worthwhile day I think. Well, you can be the judge.  
      As for me, I can't wait to blender up a whole lot more "paint".